• Home
    • Ravelry
    • About
    • Pattern FAQ
    • Privacy
    • Terms
  • Blog
    • Contact
    • Become a pattern tester
Menu

Rove Handmade

Street Address
City, State, Zip
Phone Number

Rove Handmade

  • Home
  • Patterns
    • Ravelry
  • About
    • About
    • Pattern FAQ
    • Privacy
    • Terms
  • Blog
  • Contact
    • Contact
    • Become a pattern tester

Stash-busting V-stitch shawl

July 16, 2015 Maria Valles

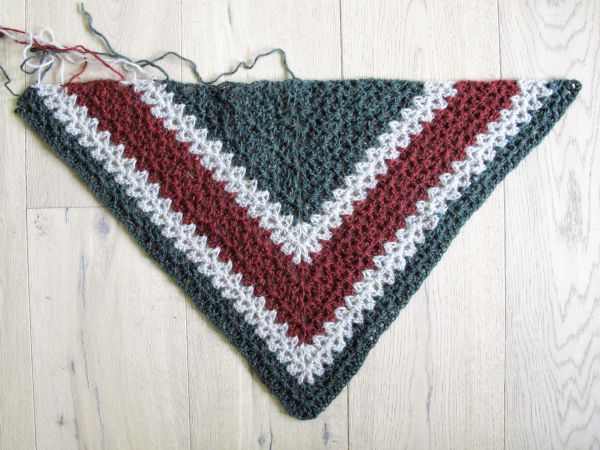
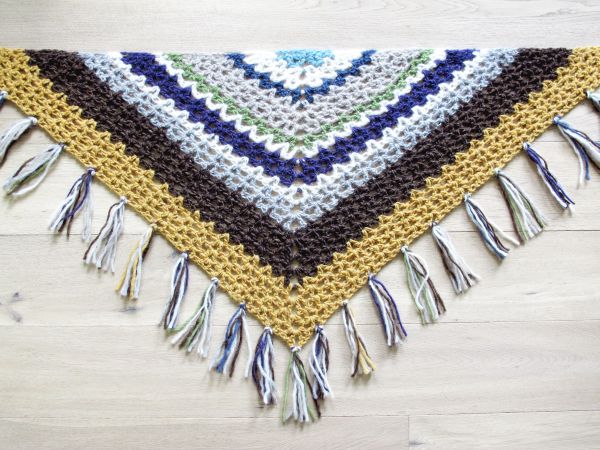
I finished this V-stitch shawl last weekend and am over the moon that I finally got the pattern to work and that I managed to use up nearly all the half-balls and bits and pieces in my yarn stash.

This project has been a long time in the making. I was inspired by the Kría shawl pattern from this book (here's a lovely example of one) and wanted to make something similar, also using a V-stitch. But instead of the slight crescent shape of the Kría, I wanted more of a straight triangle and more open Vs for an airier feel.

So I started experimenting with some Létt Lopi and ended up with this.

I liked the straight top edge but the triangle was getting too deep and was also starting to wrinkle at the sides.

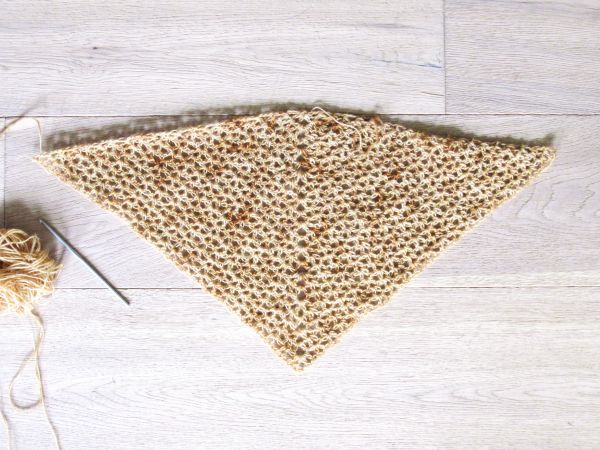
Since this result came after many tries and I was sick of frogging, I made a few adjustments and started again with some handspun lace weight. This time the top edge kept dipping at the corners. 

After ripping this one back multiple times too and still not getting it quite right, I decided to start yet again with some thicker yarn from my stash, figuring that a) it would be easier to see what I was doing with thicker yarn and a bigger hook, b) it would be faster to frog and rework than a more delicate yarn, and c) I wouldn't care as much if it didn't turn out perfectly, being a "practice" project made with odds and ends instead of a "real" one in my precious handspun, for example.

VShawlLopi.jpg

I wound up frogging this one too, more times than I'd like to admit. I really wish I were better at visualizing and calculating on paper before even picking up a hook, but, well, I'm not. I just have to do it to figure out how to do it, if that makes sense. 

I set a couple of rules for myself before I started, so I wouldn't be paralyzed by too much decision-making. The first rule was that I could only use yarn that I had in my stash, and only the small bits and partial balls - no full balls and no running to the store to pick up more of something. The second was that I would work the colours according to how much I had of each, starting with the smallest pieces and ending with the largest partial ball. And the third was that I had to try my best not to end a ball in the middle of row, which worked out really well for the most part (with a couple of exceptions).

I am so happy with the result! I was worried that some of the colours would look weird or ugly together, especially when I added the that mustard-y yellow at the bottom, but I actually like it, and having "rules" helped me to not second-guess it too much.

If you'd like to try one yourself, here is the basic "recipe" below:

Stash-busting V-stitch shawl

Materials

  • Stash yarn in any weight, enough for the finished size you want, plus extra yarn for the fringe (optional)
    • I used about 250 g (250 m) of Álafoss Lopi, which is equivalent to a bulky weight yarn. I worked 23 rows, and my shawl measures about 142 cm across the top and 64 cm down the centre.
  • Crochet hook in a size that is appropriate for your yarn
    • I used a 9mm hook because I wanted my shawl to be chunky, but not too dense or heavy.
  • Yarn needle
  • Stitch marker
    • It might help you to place a stitch marker in the centre of the triangle as you go to make sure your increases are in the right place. 

Gauge

Gauge is not terribly important for this project.

How to make the V-stitch (V st)

Make (1 dc, 1 ch, 1 dc) in the same space or stitch.

Basic pattern

Row 1: Ch 4, make 4 dc in the 4th ch from the hook. You will have one ch 3 and 4 dc in the same stitch, or 5 stitches total.

Row 2: Ch 3, V st in same st, skip next stitch, (dc, ch 3, dc) in next st, skip next stitch, (V st, dc) in last st.

Row 3: Ch 3, V st in sp between dc and V st, V st in next ch 1 sp, (V st, ch 3, V st) in ch 3 space, V st in next ch 1 sp, (V st, dc) in sp between last V st and dc of previous row.

Row 4: Ch 4 (counts as 1 dc and 1 ch), dc in same spot, V st in each ch 1 sp to centre, (dc, ch 3, dc) in ch 3 sp, V st in each ch 1 sp across the other side, V st in last dc.

Row 5: Ch 3, V st in ch 1 sp, V st in each ch 1 sp to centre, (V st, ch 3, V st) in ch 3 sp, V st in each ch 1 sp across the other side, (V st, dc) in last ch 1 sp.

Repeat rows 4 and 5 until you've reached the size you want. I did 23 rows in total. Basically, you are increasing at the ends and the centre of every row, and alternating the number of increases every other row.

I added fringe because I love fringe and it was a good way to use up every last bit of yarn, but it's entirely up to you. I cut my fringe about 32cm long and used four strands in each one. I included three neutrals + one of the other colours to tie it all together (here's a great tutorial on how to attach fringe, if you're not sure how).

After weaving in all the ends, I wet-blocked my shawl by washing it on a delicate wool cycle in the machine with a tiny bit of wool soap, and laying it flat to gently reshape it and allow it to dry. It's now nice and soft with lovely straight edges.

This is great project for using up stash yarn and experimenting with colour and proportion (here's a helpful tutorial on joining colours). If you're using a bulky yarn and big hook, it works up pretty fast too. 

Enjoy!

4 Comments

Granny cocoon shrug part 2

March 14, 2015 Maria Valles

Way back in September I wrote about this shrug that I made. It got an incredible response (thank you to all who commented!) but also a lot of questions. I realize that the original post was a bit vague, so I thought I'd do an FAQ and basic "recipe" here to answer some of the most common ones and provide some basic step-by-step instructions to make your own. Here goes:

What kind of yarn can I use?

I used two strands of single-ply unspun Icelandic wool (called plötulopi), which is about the equivalent of worsted weight. But because I used a larger hook - 7 mm - and there is some "air" in this yarn, it sort of puffs up to almost a bulky weight when worked up with the bigger hook.

I'm pretty sure you could use just about any yarn as long as it gives you the drape you want. I suggest experimenting by making swatches in different yarns/hook sizes to see what you like the best.

How much yarn did you use?

I used about 440 g/1320 m of the plötulopi but the amount will depend on the yarn and hook size you are using. Bear in mind that I crocheted two strands together, so that doubled the amount I would have used with only one strand.

What stitch is used?

My shrug is made from a granny square, which consists of double crochet (dc) stitches and chain (ch) stitches. Note: I did not ch 1 between my granny clusters because I wanted smaller "holes" between them. Since I was using a larger-than-recommended hook size (7mm), this worked out fine. 

Here is a great tutorial for how to make granny squares.

Did you make your square lengthwise or in rounds?

I made a traditional granny square in rounds.

How big was your square?

My square was about 105cm in width/length. 

Do you have a pattern?

There is a PDF pattern available for purchase here, which includes five sizes, schematics and an option for long sleeves, as well as notes on further customization. Below is a basic "recipe" for one size (fits approx M/L) that you can use as a starting point to experiment on your own:

Granny cocoon shrug basic recipe:

Step 1: Make a granny square about 105 cm (41 inches) in width/length. The number of rounds and yardage needed to get the size will depend on the yarn and hook size you are using. For the last round of your square, dc evenly all the way around. Fasten off.

Step 2: Fold your square in half to form a rectangle, with the "wrong" side facing out. Sew up one of the short sides (or use a sc or sl st join), stopping about 18 cm (7 inches) before the fold to form the armholes. Fasten off. Repeat on the other side.

Step 3: Turn your piece right-side out. If you lay it out, it should now look something like a diamond, with a long opening at centre front, the seams running horizontally across each side, and two smaller openings on each side (the armholes).

Step 4: Collar: With right side facing, join your yarn at centre front at one of the seams. Ch 3, then dc evenly all the way around. Join with a sl st to the top of your first ch 3, turn and dc all the way around again. Repeat two more times for a total of four rounds of dc. Next, ch 1, turn and sc evenly all the way around to finish. Fasten off. 

Step 5: Sleeves: With right-side facing, join your yarn at one of the armholes, then ch 3 and dc evenly all the way around. Join with a sl st to the top of the first ch. For the next round, do not turn. Ch 3, *front post dc in the next st, dc in the next st*, repeat * all the way around, alternating front post and regular crochet stitches and ending with a front post dc in the last stitch. Join with a sl st to the top of the first ch 3. Repeat for one more round. Fasten off. Repeat all of step 5 for the other sleeve.

Here is a tutorial for how to do front post double crochet.

Step 6: Weave in all your ends and enjoy your shrug!

One last thing I had to share - check out these gorgeous tiny versions of the shrug by hannajaleijonamade. They are so adorable and beautifully done!

Also, Nadia over at YARNutopia created a fabulous step-by-step video tutorial for making the shrug. I encourage you to check it out!

In How To Tags granny cocoon shrug
178 Comments

A cardigan and a cat

February 14, 2015 Maria Valles

I made a cardigan! It's not perfect, but for my first attempt at a "structured" garment, it's not bad. I didn't really have a complete design in mind, only the idea that I wanted to try raglan shaping. In doing some research, I came across Janis Cortese's General Guidelines for a Basic Sweater (update - unfortunately this page is no longer available), which is a great resource for getting started. I began with the neck and chest measurements of a favourite sweater and went from there, improvising along the way.

I'm happy with it overall, and especially happy that I finished it without ripping it all out and starting over every time I changed my mind about something. It's a little shorter than I wanted, but I ran out of yarn and decided to just use what I had (hence the short sleeves). It's also a bit on the boxy side - I might add a little belt at the back to give it some definition in the waist. Now of course I'm itching to start another one and do it "properly" this time, with more planning and less improvisation. I'd also love to try developing this into a written pattern.

In other news, we have a new family member, also called Maria. No, I'm not that vain - she was given to us by friends who were moving and unable to keep her. We actually got her in early December, but she managed to get one of the windows open (she's pretty clever) and escaped the very first night. She was lost for nearly two months before someone found her and took her to the local shelter. Thankfully she was microchipped, so the shelter was able to contact her former owners, who called us. We're very happy to have her back home with us, and it seems like she's pretty happy to be here too. 

Oh, and happy Valentine's Day!

7 Comments

Granny cocoon shrug

September 13, 2014 Maria Valles

One of my favourite projects this summer was this granny square cocoon shrug, (while I didn't get around to writing about it at the time, I did post a pic to Instagram). I had wanted to make one for a while but wasn't quite sure where to start until I saw this version.

My square measured about 105cm across, and I used two strands of plötulopi (unspun Icelandic wool) crocheted together with a 7mm hook, which gave it a chunky but light texture with a nice drape. I also did one round of double crochet as the last round of my granny square. 

IMG_4650.jpg

Next, I folded it in half and joined the short sides from the bottom edge to the "armhole" (leave a space before the fold) on either side (I used a sc join).

For the collar, I started at one of the joined corners and added five rounds of dc all the way around, turning on each round to avoid an obvious "wrong" side when it's flipped over. To make "sleeves" (more like cuffs, really), I did three rounds of alternating dc and front post dc stitches around the armhole openings.

I thoroughly enjoyed making this, and I really want to try making a version that falls a bit more like a cardigan, like this beautiful piece by Jo Storie. In the meantime, I'm pretty happy with this one, and look forward to wearing it now that fall has arrived!

EDIT: I received a lot of questions about this, so I've written a follow-up post with an FAQ and step-by-step description. You can find it here. Happy making!

In How To Tags crochet shrug, Icelandic wool, plötulopi
127 Comments

Mittens

March 1, 2014 Maria Valles
IMG_4431 copy.jpg
IMG_4425 copy.jpg

I just finished my first-ever pair of mittens! Suffering from chilly fingers after losing mine this winter and inspired by some lovely knitted pairs from the Purl Bee, I decided to try my hand at making my own. Since I'm not really a knitter, crochet was the way to go. I had some lovely charcoal yarn in my stash that I thought would be perfect, and it was - I'm so pleased with how these turned out! They are a little longer and loose fitting around the wrist, but I love how they bunch up beneath my coat sleeves. And now that I've got the basics down, I can experiment a little more next time with fit, texture, pattern and colour.

If you'd like to make your own, here is the "recipe" (as knitting and crochet patterns are called in Icelandic):

The mittens are worked from the top down, in double crochet for the body and single crochet for the thumb. I used worsted weight washable wool (Free Style from Dalegarn), and a 5.5mm hook.

1st mitten:

Start with a magic ring.

Rnd 1: Ch 3 and make 8 dc into the ring (ch 3 counts as first dc), for a total of 9 dc. Join with a slip stitch in the 3rd chain of the 1st ch 3.

Rnd 2: Ch 3, make 1 dc in same spot, 2 dc in each stitch around (18 dc), join.

Rnd 3: Ch 3, *2 dc in next st, 1 dc in next stitch*, repeat from * around (27 dc), join.

Rnds 4-10: Ch 3, dc in each stitch around, join. Note: You will make space for the thumb in the next round. I have freakishly long fingers, so the tops of my mittens are quite long - if you want them to be a little shorter, simply work fewer rounds. Try them on as you go to see how long you need the top to be. I also found it best to make it one round shorter than I thought I needed, since they do drop down a bit when worn (when your hands are down at your sides, for example), giving you some extra space. I hope that makes sense!

Rnd 10: Ch 3, dc in each stitch for 22 stitches, ch 5, skip last 5 stitches, join.

Rnds 11-20: Ch 3, dc in each stitch around, join. Note: Again, you can adjust the length as you wish here by adding or subtracting rounds.

Rnd 21: Make a corded edge (ch 1, then working backwards, make a single crochet in the previous stitch, and so on, all the way around). Join and fasten off.

Weave in ends.

2nd mitten:

Rnds 1-10: same as 1st mitten

Rnd 11: Ch 8, skip 5 dc, make a dc in 6th dc, dc around, join.

Rnds 12-21: same as 1st mitten

Thumb (same for both mittens):

Rnd 1: Insert your hook into one of the stitches at the edge of the thumb hole. Ch 1, make a sc in the same spot, and sc all the way around, making 1 sc in each of the dc posts on either side of the hole - you should have 12 sc. Join.

Rnds 2-10: Ch 1, sc all the way around. Join. Note: If you have longer or shorter thumbs, you can adjust the number of rounds here.

Rnd 11: Ch 1, make a sc decrease (insert hook into stitch, yo, pull through, insert hook into next stitch, yo, pull through, yo, pull through 3 loops on hook), continue decreasing all the way around (you should have 6 sc), join and fasten off.

To close the thumb, turn the mitten inside out and thread the yarn tail through a yarn needle. Work the needle through all the stitches around the top and pull tight to close the thumb. I also worked a few stitches back and forth across the top of the thumb. Fasten off and weave in the end.

Ta-da! New mittens for these remaining days of winter. Enjoy!

In How To
3 Comments
← Newer Posts Older Posts →

Hello and welcome! I’m Maria Valles, a designer-maker from Canada who calls Reykjavík, Iceland home and has developed a lasting love affair with Icelandic wool, known as lopi. Endlessly inspired by my surroundings and the wool that is grown and prod…

Hello and welcome! I’m Maria Valles, a designer-maker from Canada who calls Reykjavík, Iceland home and has developed a lasting love affair with Icelandic wool, known as lopi. Endlessly inspired by my surroundings and the wool that is grown and produced here, I am the head and hands behind Rove Handmade.


Subscribe

Sign up with your email address to receive news and updates from Rove Handmade, and be the first to hear about upcoming releases, promotions, events, and more.

We respect your privacy.

Thank you for signing up! To receive Rove Handmade’s newsletter, please check your email to confirm your subscription. You can unsubscribe at any time by clicking the Unsubscribe link at the bottom of any newsletter emails you receive from Rove Handmade.


INSTAGRAM

Slow fashion Sunday #plötulopi #grannysquare
Replenishing #plötulopi #einband
Lazy day
Sunday
Home sweet home. New post on the blog
Saturday stash-busting #grannysquares #wip
Bolludagur 😃 #creampuffday #brauðogco
Big blue sky on this morning’s walk
Very pleased with my happy scrappy runner, which used up almost all of my cotton stash yarn 😀

  • How To
  • Making
  • Patterns
  • Shop

About

Patterns

Blog

Contact

Become a pattern tester

© Rove Handmade | All rights reserved