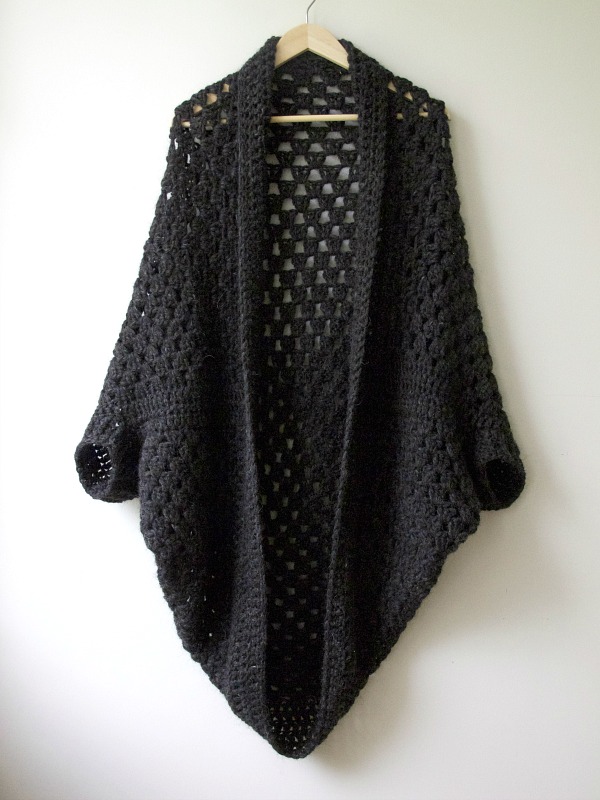
Way back in September I wrote about this shrug that I made. It got an incredible response (thank you to all who commented!) but also a lot of questions. I realize that the original post was a bit vague, so I thought I'd do an FAQ and basic "recipe" here to answer some of the most common ones and provide some basic step-by-step instructions to make your own. Here goes:
What kind of yarn can I use?
I used two strands of single-ply unspun Icelandic wool (called plötulopi), which is about the equivalent of worsted weight. But because I used a larger hook - 7 mm - and there is some "air" in this yarn, it sort of puffs up to almost a bulky weight when worked up with the bigger hook.
I'm pretty sure you could use just about any yarn as long as it gives you the drape you want. I suggest experimenting by making swatches in different yarns/hook sizes to see what you like the best.
How much yarn did you use?
I used about 440 g/1320 m of the plötulopi but the amount will depend on the yarn and hook size you are using. Bear in mind that I crocheted two strands together, so that doubled the amount I would have used with only one strand.
What stitch is used?
My shrug is made from a granny square, which consists of double crochet (dc) stitches and chain (ch) stitches. Note: I did not ch 1 between my granny clusters because I wanted smaller "holes" between them. Since I was using a larger-than-recommended hook size (7mm), this worked out fine.
Here is a great tutorial for how to make granny squares.
Did you make your square lengthwise or in rounds?
I made a traditional granny square in rounds.
How big was your square?
My square was about 105cm in width/length.
Do you have a pattern?
There is a PDF pattern available for purchase here, which includes five sizes, schematics and an option for long sleeves, as well as notes on further customization. Below is a basic "recipe" for one size (fits approx M/L) that you can use as a starting point to experiment on your own:
Granny cocoon shrug basic recipe:
Step 1: Make a granny square about 105 cm (41 inches) in width/length. The number of rounds and yardage needed to get the size will depend on the yarn and hook size you are using. For the last round of your square, dc evenly all the way around. Fasten off.
Step 2: Fold your square in half to form a rectangle, with the "wrong" side facing out. Sew up one of the short sides (or use a sc or sl st join), stopping about 18 cm (7 inches) before the fold to form the armholes. Fasten off. Repeat on the other side.
Step 3: Turn your piece right-side out. If you lay it out, it should now look something like a diamond, with a long opening at centre front, the seams running horizontally across each side, and two smaller openings on each side (the armholes).
Step 4: Collar: With right side facing, join your yarn at centre front at one of the seams. Ch 3, then dc evenly all the way around. Join with a sl st to the top of your first ch 3, turn and dc all the way around again. Repeat two more times for a total of four rounds of dc. Next, ch 1, turn and sc evenly all the way around to finish. Fasten off.
Step 5: Sleeves: With right-side facing, join your yarn at one of the armholes, then ch 3 and dc evenly all the way around. Join with a sl st to the top of the first ch. For the next round, do not turn. Ch 3, *front post dc in the next st, dc in the next st*, repeat * all the way around, alternating front post and regular crochet stitches and ending with a front post dc in the last stitch. Join with a sl st to the top of the first ch 3. Repeat for one more round. Fasten off. Repeat all of step 5 for the other sleeve.
Here is a tutorial for how to do front post double crochet.
Step 6: Weave in all your ends and enjoy your shrug!
One last thing I had to share - check out these gorgeous tiny versions of the shrug by hannajaleijonamade. They are so adorable and beautifully done!
Also, Nadia over at YARNutopia created a fabulous step-by-step video tutorial for making the shrug. I encourage you to check it out!