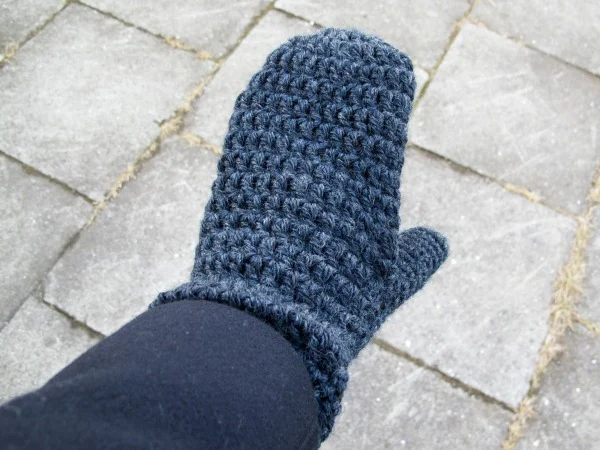

I just finished my first-ever pair of mittens! Suffering from chilly fingers after losing mine this winter and inspired by some lovely knitted pairs from the Purl Bee, I decided to try my hand at making my own. Since I'm not really a knitter, crochet was the way to go. I had some lovely charcoal yarn in my stash that I thought would be perfect, and it was - I'm so pleased with how these turned out! They are a little longer and loose fitting around the wrist, but I love how they bunch up beneath my coat sleeves. And now that I've got the basics down, I can experiment a little more next time with fit, texture, pattern and colour.
If you'd like to make your own, here is the "recipe" (as knitting and crochet patterns are called in Icelandic):
The mittens are worked from the top down, in double crochet for the body and single crochet for the thumb. I used worsted weight washable wool (Free Style from Dalegarn), and a 5.5mm hook.
1st mitten:
Start with a magic ring.
Rnd 1: Ch 3 and make 8 dc into the ring (ch 3 counts as first dc), for a total of 9 dc. Join with a slip stitch in the 3rd chain of the 1st ch 3.
Rnd 2: Ch 3, make 1 dc in same spot, 2 dc in each stitch around (18 dc), join.
Rnd 3: Ch 3, *2 dc in next st, 1 dc in next stitch*, repeat from * around (27 dc), join.
Rnds 4-10: Ch 3, dc in each stitch around, join. Note: You will make space for the thumb in the next round. I have freakishly long fingers, so the tops of my mittens are quite long - if you want them to be a little shorter, simply work fewer rounds. Try them on as you go to see how long you need the top to be. I also found it best to make it one round shorter than I thought I needed, since they do drop down a bit when worn (when your hands are down at your sides, for example), giving you some extra space. I hope that makes sense!
Rnd 10: Ch 3, dc in each stitch for 22 stitches, ch 5, skip last 5 stitches, join.
Rnds 11-20: Ch 3, dc in each stitch around, join. Note: Again, you can adjust the length as you wish here by adding or subtracting rounds.
Rnd 21: Make a corded edge (ch 1, then working backwards, make a single crochet in the previous stitch, and so on, all the way around). Join and fasten off.
Weave in ends.
2nd mitten:
Rnds 1-10: same as 1st mitten
Rnd 11: Ch 8, skip 5 dc, make a dc in 6th dc, dc around, join.
Rnds 12-21: same as 1st mitten
Thumb (same for both mittens):
Rnd 1: Insert your hook into one of the stitches at the edge of the thumb hole. Ch 1, make a sc in the same spot, and sc all the way around, making 1 sc in each of the dc posts on either side of the hole - you should have 12 sc. Join.
Rnds 2-10: Ch 1, sc all the way around. Join. Note: If you have longer or shorter thumbs, you can adjust the number of rounds here.
Rnd 11: Ch 1, make a sc decrease (insert hook into stitch, yo, pull through, insert hook into next stitch, yo, pull through, yo, pull through 3 loops on hook), continue decreasing all the way around (you should have 6 sc), join and fasten off.
To close the thumb, turn the mitten inside out and thread the yarn tail through a yarn needle. Work the needle through all the stitches around the top and pull tight to close the thumb. I also worked a few stitches back and forth across the top of the thumb. Fasten off and weave in the end.
Ta-da! New mittens for these remaining days of winter. Enjoy!