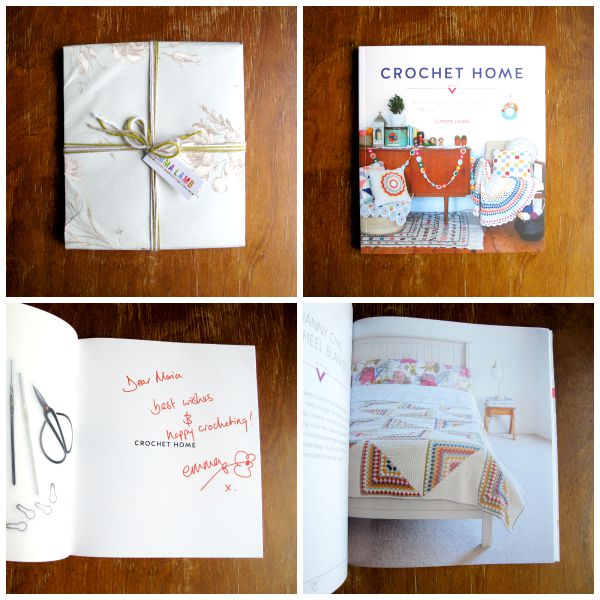
I just got my signed (!) copy of Emma Lamb's gorgeous book, Crochet Home. It's filled with truly lovely and inspiring crochet projects for the home, beautifully photographed and presented. I've been a fan of Emma and her granny chic style for a long time, and while I don't normally crochet from other designers' patterns (though I love collecting crochet books and magazines), I definitely see a Granny Chic Pinwheel Blanket in my very near future.
Prototype
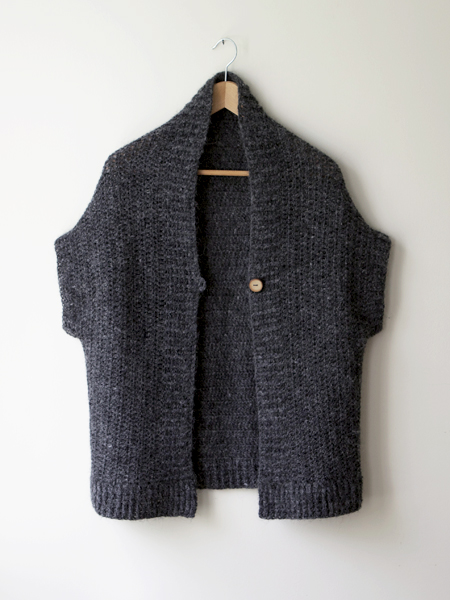

Designing is an iterative process for me. I've said this before, but I usually need to physically do something to figure it out and having a finished thing in front of me helps me envision more clearly how to make it better. I do sketch a lot, and though I'm getting better at swatching and plotting measurements beforehand, most of the time I still end up diving in with little more than a rough idea of what I want.
I finished this prototype a few weeks ago. I've been inspired lately by garments with simple but interesting constructions and minimal shaping - I love how clean and modern they look, and not having to fiddle too much with calculating increases and decreases is a plus in my book. This one still needs some work - I like it but it's not quite what I imagined. Now that I've worn it a few times to test it out, I think I know what needs to be adjusted and will be starting work on version 2 (hopefully) very soon. Stay tuned!
Amma - granny square top
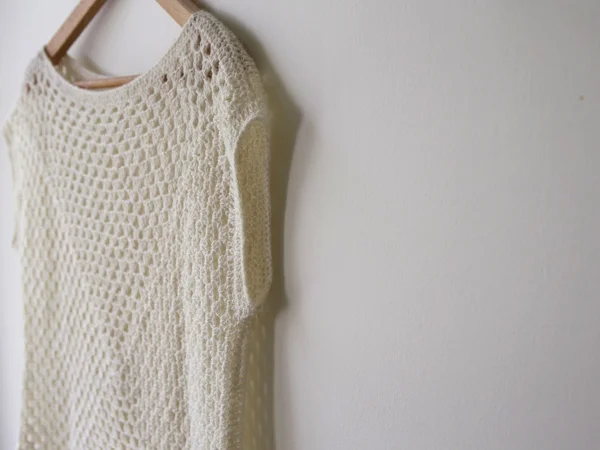
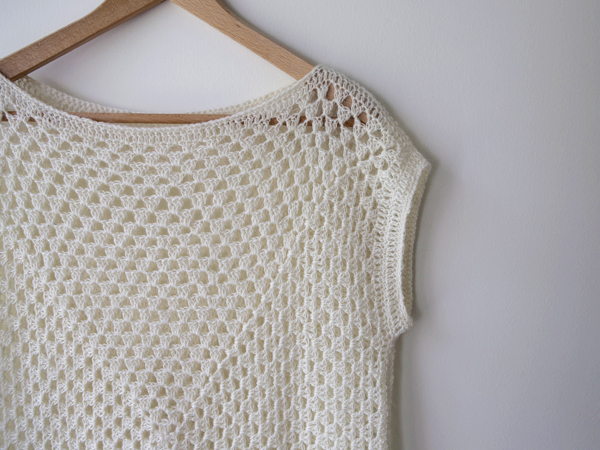
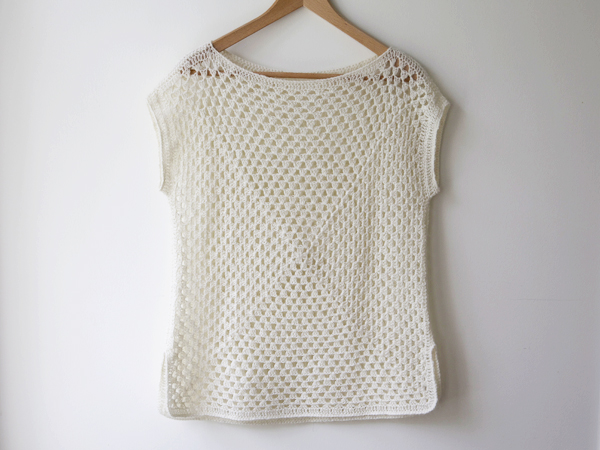
Here at last is the recipe for my granny square top, which I'm calling "Amma" because it's Icelandic for "Granny". I finished this top in August, just in time for the last days of summer, and have worn it twice since then (you can see it in action on Instagram). I absolutely love it and it's such a great feeling to wear something you made yourself.
This top is super simple - just two granny squares joined together - and has a loose fit that skims the body - not too clingy and not too boxy. I made this to fit me and it's about 40" in total width. To make it in your preferred size, use your hip or bust measurement (whichever is larger) + desired ease (I added about 2"), divided by 2 as a guideline for the size of your squares.
Example: To fit hip 38" + 2" ease, use 40/2 = 20. Each square should measure 20".
The yarn is Álafoss Einband, which is an Icelandic lace-weight wool. It's light but also warm, just right for Iceland's cooler summers. If you plan to make this for warmer climates or you don't like wool, something like linen might be a good substitute. If you do choose Einband, note that it feels a bit coarse when you're working with it, but it softens after blocking. It also stretches when washed, so it's always best to do a swatch first. Swatching is definitely recommended if you're substituting another yarn.
MATERIALS
3 skeins Álafoss Einband lace-weight wool (50 g/250 m per skein)
3.5 mm crochet hook or size needed to obtain gauge
Yarn needle
Stitch markers
GAUGE
5 rounds of granny square = 4"
STITCHES USED
st - stitch
ss - slip stitch
sc - single crochet
dc - double crochet
ch - chain stitch
INSTRUCTIONS
Granny square (make 2)
Make a traditional granny square in whichever way you like doing them. I like the method below:
Make a magic ring
Round 1 - Ch 5 (counts as 1st dc + ch 2 throughout), 3 dc into ring, *ch 2, 3 dc into ring*, repeat from * to * once more, ch 2, 2 dc, ss into 3rd ch of beginning ch 5 to join, and pull on the yarn tail to close the ring tight.
Round 2 - Ss into ch 2 sp, ch 5, 3 dc into same space, *ch 1, (3 dc, ch 2, 3 dc) into next ch 2 space*, repeat from * to * two times, ch 1, 2 dc in last ch 2 sp, ss into 3rd ch of beginning ch 5 to join.
Round 3 - Ss into ch 2 sp, ch 5, 3 dc into same sp, *ch 1, 3 dc into next ch 1 sp, ch 1, (3 dc, ch 2, 3 dc) into next ch 2 sp*, repeat from * to * two times, ch 1, 3 dc in ch 1 sp, ch 1, 2 dc in last ch 2 sp, ss into 3rd ch of beginning ch 5 to join.
Repeat Round 3, making 3 dc into each ch 1 sp and (3 dc, ch 2, 3 dc) into each ch 2 corner sp for 21 more rounds or until your square is the desired size.
Round 25 (or last round) - Ss in ch 2 sp, ch 3 (counts as 1st dc), dc in same space, dc evenly all the way around, making 3 dc in each ch 2 corner sp, end with 1 dc in last ch 2 sp, join with ss to top of beginning ch 3, fasten off.
Joining

Here is a very basic schematic to give you the general idea. Adjust measurements as needed.
Lay your squares one on top of the other with the right sides facing each other. At the top edge, place a stitch marker approximately 4"* from each side edge to mark the shoulder seams and neck opening. *Or desired shoulder seam length.
From the shoulder, place a marker approx. 7.5"* down each side for the armholes. *Or desired armhole depth.
For the side slits, place markers approximately 4" up from the bottom on each side.
Join the shoulder seams and side seams together using your preferred method. I'm impatient, so I just did a sc join. If I were making another one, I might whipstitch it for a less bulky seam.
Note: You can block your squares before joining them, but once again I was too impatient. I blocked my piece after it was done and that seemed to work out fine for me.
Neckline
Round 1 - With right side facing, join yarn in one corner of the neck opening, ch 1, sc in each st around, join with ss to 1st st.
Round 2 - Ss in each st around, ss into 1st st to join, fasten off.
Sleeves
Round 1 - With right side facing, join yarn at the seam at the bottom of one armhole, ch 1, sc in each st around, ss into 1st sc to join.
Round 2 - Ch 3, dc around, ss into top of beginning ch 3 to join.
Round 3 - Ch 1, sc in each st around, ss into 1st sc to join.
Round 4 - Ss in each st around, ss into 1st ss to join, fasten off.
Repeat for other sleeve.
Hem
Round 1 - With right side facing, join yarn at the seam in one side slit, ch 1, sc evenly around hem making 3 sc in the centre st of each 3 dc corner, ss into 1st sc to join.
Round 2 - Ss in each st around, making 3 ss in the centre sc of each 3 sc corner, ss to 1st st to join, fasten off.
Finishing
Weave in ends and block to size.
Note: I gently washed and hung my top up to dry, letting gravity do the work to stretch and lengthen the piece. This might not work with a different yarn though.
I hope you like this simple little top as much as I do - enjoy!
Weekend
Yesterday I spent most of the day cleaning. First H and I did our weekly ritual of cleaning the apartment - it's a small space so thankfully this only takes about an hour or so (that's tidying up, dusting, vacuuming, bathroom, floors, the lot…one of the things I love about living small). Then I decided to tackle the office. I honestly didn't think it was that bad - maybe a couple of hours of organizing and I'd be good to go. It's a pretty tiny room, after all. Four hours later I was still going through papers and sorting supplies. But it was worth it. Now the space feels calmer, brighter, even spacious despite its tiny dimensions. And it definitely puts me in a much better frame of mind to get things done.
For today, I'm going to start by stealing a quiet moment, pouring myself a cup of tea, and savouring this little treasure.

It's Pom Pom Quarterly's Autumn 2015 issue (with my North Toque pattern in it! ). It arrived on Thursday, beautifully wrapped in pretty teal tissue like a lovely gift. What better way to spend a rainy Sunday morning?
North Toque

© Amy Gwatkin. Used with permission.

© Amy Gwatkin. Used with permission.

© Amy Gwatkin. Used with permission.
I am so happy to finally get to share some exciting news - my North Toque pattern is in the upcoming Autumn 2015 issue of Pom Pom Quarterly magazine! If you haven't seen the magazine before, I urge you to check it out - it's just beautiful. I am honoured to be part of this issue and in the company of such talented designers, and was blown away by these gorgeous images shot by Amy Gwatkin (and which the magazine very generously shared with me to share with you).
I've been keeping this one under my hat (see what I did there?) for some time, having submitted the proposal way back in March. I literally danced around my kitchen when I got the news that it was accepted. Of course, then I had to actually write the pattern. It was the first time I'd ever written more than one size for anything, and let me tell you, it was hard work, but so rewarding. And everyone at Pom Pom was just so lovely - I really couldn't have asked for a better experience. A very big thank you goes out to all of them :)
The toque itself is made in Icelandic Álafoss Lopi wool (surprise, surprise), which fits perfectly with the issue's wool theme. You can see a preview on Pom Pom's website, as well as order print and/or digital copies. I cannot wait to get the print copy in my hands! Oh, and there's a Ravelry page too, in case you'd like to add this to your queue.